CURE - GUI
Previous posts in this series:
- CURE-Design
- CURE-Environment
- CURE-Database design
- CURE-Detector foundation
- CURE-Detector step-by-step
As described in my previous posts, Micke took the responsibility of setting up and coding the GUI parts of CURE. In this post I’ll try to describe the setup, even though I’m not 100% sure what the hell I’m talking about… But I’ll give it a shot!
Server and App
Micke made some decisions regarding the GUI and went about installing the components needed on a fresh Ubuntu VM, steal what needed to be stolen and code what needed to be coded. Besides PostgreSQL, Nginx and Python 3.6.6 was installed. He decided to run the GUI as a Gunicorn app within a venv virtual environment, so also these python modules were installed.
Create a user to host and run the app and add it to www-data group (nginx process user):
sudo useradd -m cureweb
sudo passwd cureweb
sudo usermod -a -G www-data cureweb
App folder structure.
In /home/local/cureweb/cure we find (approximate) this folder structure:
| Name | Type | Description |
|---|---|---|
| app | folder | The app directory for the CURE GUI app |
| migration | folder | Flask-Migrate extension (for SQLAlchemy database migrations ) |
| venv | folder | The venv module folder |
| .env | file | The environment variables and secrets |
| config.py | file | Flask and sql config file |
| requirements.txt | file | Python pip requirements file (?) |
| run.py | file | Starts the app |
If we take a closer look in the app folder we find this (approximate) content:
| Name | Type | Description |
|---|---|---|
| static | folder | the static content such as css, fonts, images, javascript |
| templates | folder | the HTML templates |
| init.py | file | The app ini file to load SQLAlchemy, Flask etc. |
| api.py | file | Used for the “snooze” functionality on a detector |
| auth.py | file | For authenticating to LDAP (Active Directory) |
| forms.py | file | For defining the Jinja2 flaskwtf form for login |
| models.py | file | Data modeling |
| views.py | file | The routing (this is where the frontend magic happens) |
And if we look in the static folder we find this (approximate) content:
| Name | Type | Description |
|---|---|---|
| css | folder | CSS for icons, menu and browser support. mostly borrowed. |
| fonts | folder | Fonts |
| img | folder | Images |
| js | folder | Javascript such as jquery, modernizr, sortable etc. |
| sound | folder | sound (for audio warning on red alert) |
And if we finally peek in the templates folder we find this (approximate) content:
| Name | Type | Description |
|---|---|---|
| _detector.html | file | How all detector square should look-color, snooze, text, links etc. |
| base.html | file | The base template. Contains menue, js, css etc. |
| compact.html | file | Compact mode template |
| compact_detector.html | file | Compact mode template |
| description.html | file | Custom details of detector events with links etc |
| history.html | file | To get all historical events for a detector |
| index.html | file | The index file |
| login.html | file | Jinja specific to render the login form |
You can find the files and folders (of importance) here
Create a service for the app.
In order for the app to run at startup, create a service.
sudo nano /etc/systemd/system/cure.service
With this content:
[Unit]
Description=Cure webapp service
After=network.target

[Service]
User=cureweb
Group=www-data
Restart=always
RestartSec=1
WorkingDirectory=/home/local/cureweb/cure
Environment="PATH=/home/local/cureweb/cure/venv/bin"
ExecStart=/home/local/cureweb/cure/venv/bin/gunicorn --workers 3 --bind unix:cure.sock run:app

[Install]
WantedBy=multi-user.target
The service can then be started and enabled.
sudo systemctl start cure
sudo systemctl enable cure
Configure nginx
With a command like this, an nginx config is made
sudo nano /etc/nginx/sites-enabled/cure
And with content similar to this
server {
    # listen on port 80 (http)
    listen 80;
    server_name cure.company.xx;
    location / {
        # redirect any requests to the same URL but on https
        return 301 https://$host$request_uri;
    }
}
server {
    # listen on port 443 (https)
    listen 443 ssl;
    server_name cure.company.xx;

    ssl                     on;
    ssl_certificate         /etc/nginx/certs/mycert.crt;
    ssl_certificate_key     /etc/nginx/certs/mycert.key;
    ssl_session_timeout     5m;
    ssl_protocols                   TLSv1 TLSv1.1 TLSv1.2;
    ssl_ciphers 'ECDHE-RSA-AES128-GCM-SHA256:ECDHE-ECDSA-AES128-GCM-SHA256:ECDHE-RSA-AES256-GCM-SHA384:ECDHE-ECDSA-AES256-GCM-SHA384:DHE-RSA-AES128-GCM-SHA256:DHE-DSS-AES128-GCM-SHA256:kEDH+AESGCM:ECDHE-RSA-AES128-SHA256:ECDHE-ECDSA-AES128-SHA256:ECDHE-RSA-AES128-SHA:ECDHE-ECDSA-AES128-SHA:ECDHE-RSA-AES256-SHA384:ECDHE-ECDSA-AES256-SHA384:ECDHE-RSA-AES256-SHA:ECDHE-ECDSA-AES256-SHA:DHE-RSA-AES128-SHA256:DHE-RSA-AES128-SHA:DHE-DSS-AES128-SHA256:DHE-RSA-AES256-SHA256:DHE-DSS-AES256-SHA:DHE-RSA-AES256-SHA:AES128-GCM-SHA256:AES256-GCM-SHA384:AES128-SHA256:AES256-SHA256:AES128-SHA:AES256-SHA:AES:CAMELLIA:DES-CBC3-SHA:!aNULL:!eNULL:!EXPORT:!DES:!RC4:!MD5:!PSK:!aECDH:!EDH-DSS-DES-CBC3-SHA:!EDH-RSA-DES-CBC3-SHA:!KRB5-DES-CBC3-SHA';
    ssl_prefer_server_ciphers       on;

    # write access and error logs to /var/log
    access_log /var/log/cure_access.log;
    error_log /var/log/cure_error.log;

    location / {
        # forward application requests to the gunicorn server
        proxy_pass http://unix:/home/local/cureweb/cure/cure.sock;
        proxy_redirect off;
        proxy_set_header Host $host;
        proxy_set_header X-Real-IP $remote_addr;
        proxy_set_header X-Forwarded-For $proxy_add_x_forwarded_for;
    }

    location /static {
        # handle static files directly, without forwarding to the application
        alias /home/local/cureweb/cure/app/static;
        expires 30d;
    }
}
The result
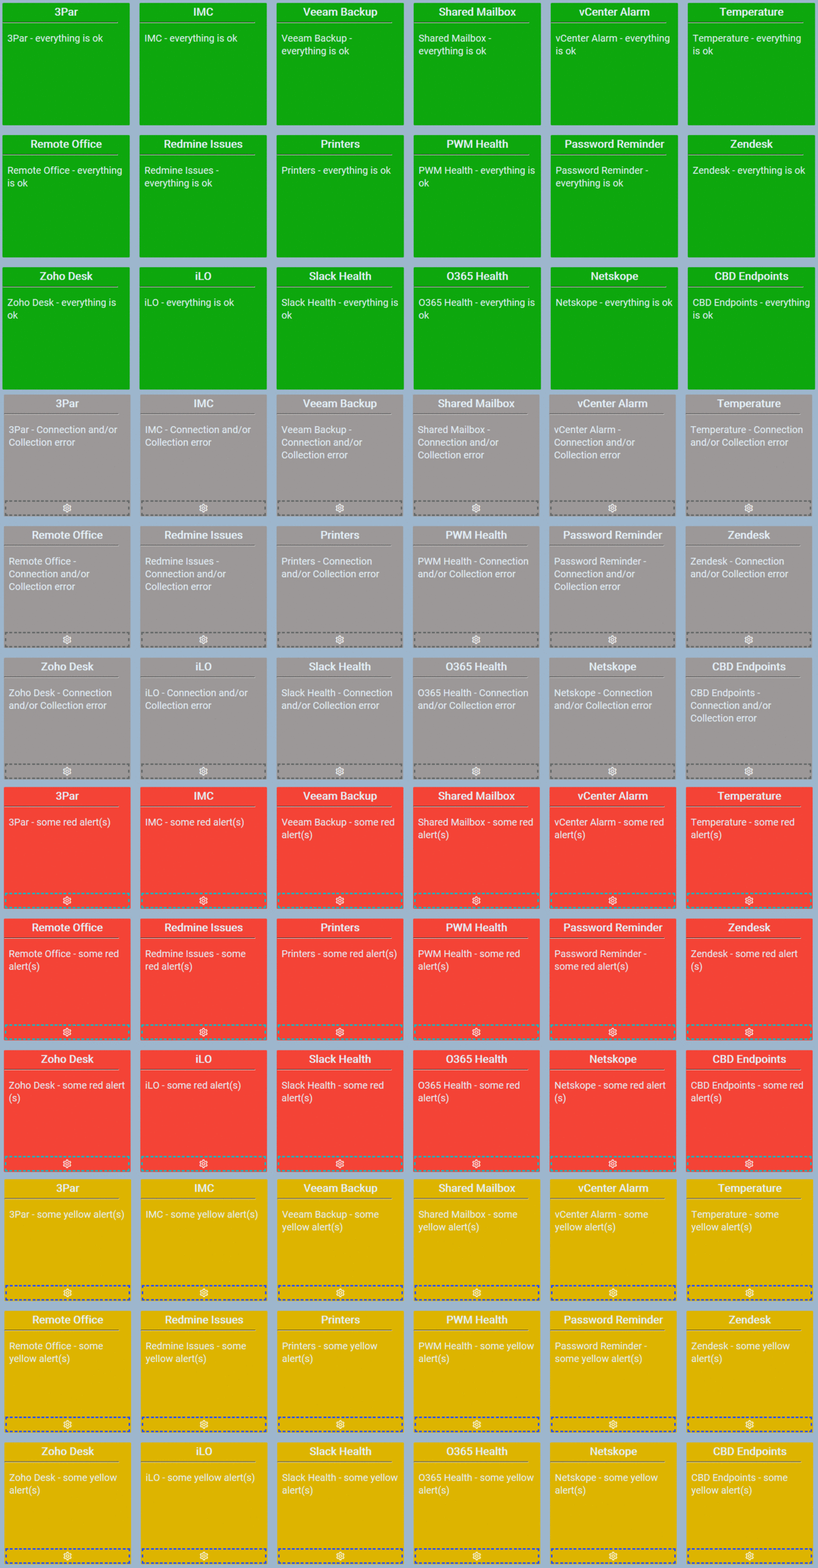
This gif gives an idea of how the landing page will look with different levels of alerts.

When clicking the headline of a detector, you get the details

And when toggling the headline on the detector details page, you see some details on the detector itself, such as id, heartbeat, environment, status and history.

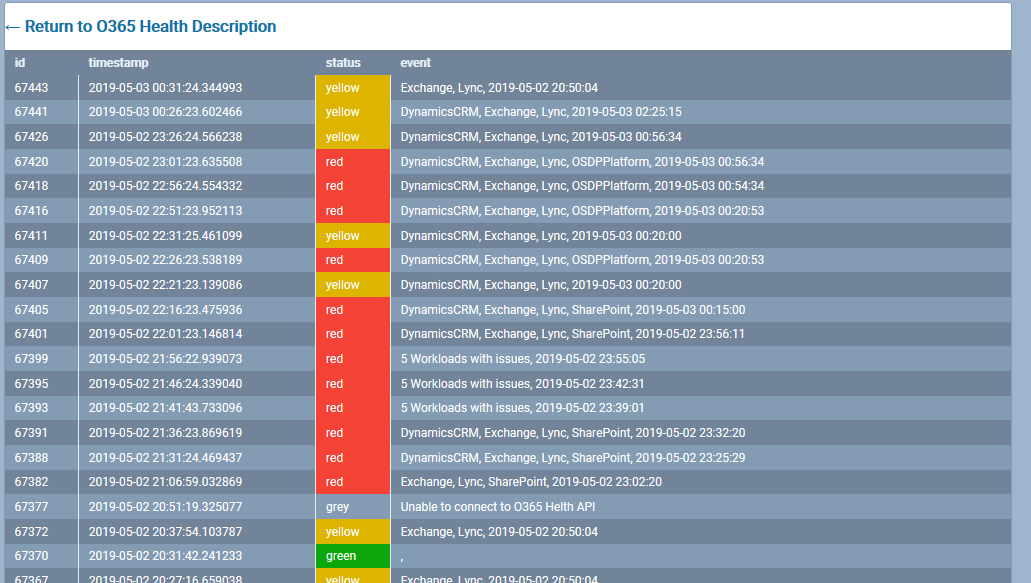
And when clicking the history link you get an overview of the historical statuses for the specific detector.

UPDATED ON 2019-05-03 I just took the time to go through what Micke has been working on, pretty much on his own, on and off during the last 6 months. Many of my assumptions of the GUI was wrong and/or has been changed during this time, so I’ve updated this post, complete with some images on how it currently looks.
The personal experiences, viewpoints and opinions expressed in this blog post are my own and in no way represent those of the company.
